Difference between revisions of "Roll20 Primer"
Tag: visualeditor-wikitext |
Tag: visualeditor-wikitext |
||
| Line 76: | Line 76: | ||
** Click the '''Show''' button | ** Click the '''Show''' button | ||
** Shuffle the deck by hovering your mouse over the deck like you do when you draw and selecting the option. This ensures that the deck will recognize that the cards are infinite. | ** Shuffle the deck by hovering your mouse over the deck like you do when you draw and selecting the option. This ensures that the deck will recognize that the cards are infinite. | ||
{{clear}} | |||
==Setting up a Page== | ==Setting up a Page== | ||
Revision as of 23:19, 17 June 2020
Basic Roll20 Primer
A primer on configuring a basic Roll20 table.
Credits for original guide to User:Teksura and Ulminati
Prologue
This guide exists to help you out with something that Roll20 is not necessarily that great at explaining: Setting up your table. Of course, you are free to set up your table any way you like. Nothing in this guide is required - it is merely a tool to help you understand the ins and outs of setting up and using a table on Roll20. This guide covers basic principles - check out the Advanced guide for some more in-depth additions.
Finally, thank you for taking the time to become a GM and prepare runs for the community. You are awesome.
Creating a Table
Roll20 calls tables ‘games.’ To create a table:
- Go to your games page and click ‘create new game’ (Fig 1.1, above).
- You will be given a short form to fill out to create the table.
- You can give the table any name you like.
- You can also choose a character sheet template (search for ‘Shadowrun’).
- On Shadowhaven, the use of this function is not required.
- It is mostly used if you wish to save common NPC templates (guards, etc).
Following table creation, you should see the splash screen (Fig 1.2, below).
- You can select a thematic banner, if you like.
- To do so, click ‘Choose a File’ or drag an image onto the indicated area.
- For all other content in this guide, you must be ‘on table.’
- To do so, click ‘Launch Game.’
Disabling Camera and Microphone
By default, Roll20 will enable camera and microphones.
- This may cause players to accidentally transmit their audio or video when they connect for the first time - both an annoyance and a privacy concern.
- It is therefore important to disable this before your first game. To do so, navigate to your options menu by clicking the gear icon in the upper right corner.
- This is the same menu where you change your name at a table.
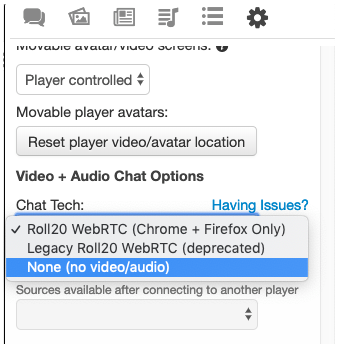
- Scroll down until you see the Video + Audio Chat Options (Fig 2.1, above). You will see a dropdown box under Chat Tech. Select None (no video/audio).
- This will reload your table with audio/video transmission disabled.
Edge and Common Sense Decks
The use of card decks to track Edge and Common Sense on a table is a useful practice. These decks can help to easily track remaining edge and common sense among the PCs. To set them up:
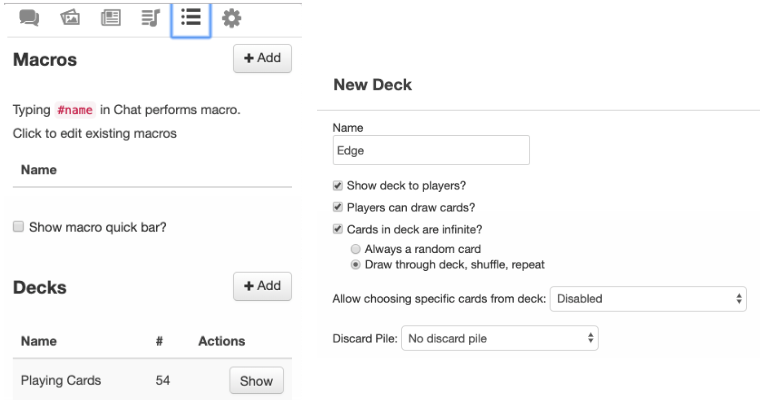
* Open the macros tab (the icon next to the ‘options’ gear. It’s the 3 horizontal lines with the dots next to them (Fig 3.1, right)). ** By default, you’ll have a deck of playing cards. We’re going to make a new deck. ** Click the + Add button next to Decks. (Fig 3.1). This creates a “New Deck”. You now have to set it up. Double click on New Deck to edit the deck. ** You will see the configuration window for the deck pop up. (Fig 3.2, right). Fig 3.1 - Roll20 ‘Macros’ tab. Note the +Add button next to ‘Decks’
Fig 3.2 - Deck configuration window. Note the options in checkboxes and radio buttons.
Here you can name the deck. The important options you’ll need to check include:
- Show deck to players?
- Players can draw cards?
- Cards in deck are infinite?
- Draw through deck, shuffle, repeat
After you’ve done this, you’ll need to configure the images for the deck and add the cards themselves. To do so:
- Upload a card back (scroll down to see the option). This can be anything you like.
- It’s often good to pick something people will be able to associate with Edge or Common sense.
- To add cards to the deck:
- Click + Add Card and name the card and upload an image for the front.
- You only need the 1 card.
- Most GMs upload whatever image they used for the card back.
- Roll20 can be a little finicky when uploading with the button, you may need to use their drag and upload feature, or upload direct to your library first.
- Click + Add Card and name the card and upload an image for the front.
- To show the deck to the players for use:
- Click the Show button
- Shuffle the deck by hovering your mouse over the deck like you do when you draw and selecting the option. This ensures that the deck will recognize that the cards are infinite.
Setting up a Page
In the upper right corner of your table (next to the chat panel and the zoom slider), you’ll find the icon for the page toolbar (Fig 4.1, above).
- This opens a panel that lets you add, delete and configure pages.
- Many tables make do with just one page for the players.
- Other tables like to have multiple pages, so they can keep their maps prepared separately. This is entirely a matter of taste.
- For now, click the icon to expand the panel (Fig 4.2, above).
The panel contains a list of all pages on your table.
- One of them is going to have a red Players ribbon.
- This is the page all your players are currently seeing.
- To move your players point of view from one page to another, simply click-and-drag the ribbon to the page you’d like to send them to.
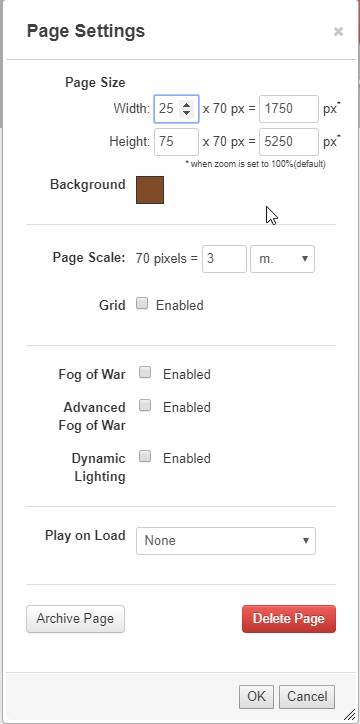
- If you hover your mouse cursor over a page, the blue Page Settings button will be visible (Fig 4.3, right).
Boxes, Backgrounds, and Maps
Tables usually have elements (boxes and maps) for players.
- These don’t need to be anything fancy.
- You can set them up with the drawing tool on the map layer.
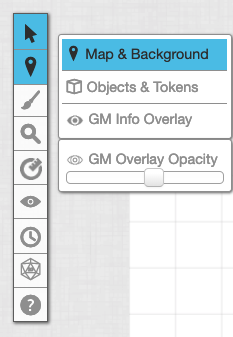
- Select the second icon on the upper left toolbar, then select Map & Background.
- You can then use the drawing tools below that icon. (Fig 5.1, right)
- You can also upload a graphic by being on the Map & Background layer, and dragging and dropping the image onto the table. You can resize it as needed.
- This is a good way to set up your boxes, as you can create them in a much better drawing program, type out the text, and duplicate them easily.
- Select the second icon on the upper left toolbar, then select Map & Background.
- For maps specifically, you can use pages through the page toolbar (Fig 4.1, 4.2).
- You can prepare ahead of time, or create a map on the fly using drawing tools.
- It is highly recommended that you put your maps on the Maps & Background layer so they don’t get in the way when you start trying to move NPCs around.
- If you or your players don’t like things snapping to the grid that is on pages by default, you can turn the grid off in the page settings (Fig 4.3).
Advanced Roll20 Primer
A primer on some of the more advanced features of Roll20.
Credits for original guide to User:Teksura and Ulminati
Prologue
This guide assumes that you have set up a basic Roll20 table and are looking for options to improve and streamline your pretend crime GM operations. This guide covers advanced principles - check out the basic guide for simple setups.
As always, thank you for taking the time to become a GM and prepare runs for the community. You are awesome.
/gmroll
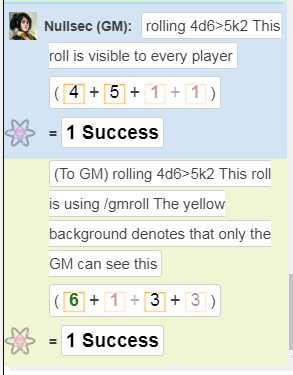
You’re probably already familiar with the /roll command as a player. The /gmroll is similar, but with one major difference:
- /gmrolls can only be seen by the GM (you).
- To use it, type ‘/gmroll [dicepool] (Fig 6.1, right).
- This helps you keep suspense up as the players won’t know just how many dice that guard is throwing to see them. Or indeed if there is any guard at all.
- Whether to roll dice openly with /roll or hidden with /gmroll is often a matter of personal preference (as it can lead to potential metagaming)
- Most GMs settle for a mix between GMrolls and open rolls depending on context.
- Players can use the /gmroll command as well - those rolls will be visible only to the player who typed it and the GM. This is useful if a player wants to do something but not necessarily let the rest of the team know what they’re doing and how it went
Handouts
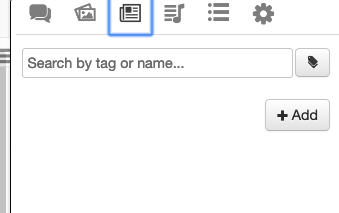
Handouts are documents and items that you might want to use to communicate information to your players. The menu (above the chat window) looks like a newspaper (Fig 7.1, right):
- You can add tokens (more on that below) and handouts here.
- Click + Add and you will have a dropdown asking you to select a Character, Handout, or Folder (Fig 2.1).
- If you want players to be able to see them, you need to add them to In Player’s Journals.
- If you want them to be able to edit the handout, you’ll want to add their name to Can Be Edited & Controlled By.
- Note they have to actually have already joined your table to grant them this permission, unless you grant it to All Players.


