Difference between revisions of "ShadowHaven Reloaded:PC Page Creation Guide"
Tag: visualeditor-wikitext |
m (→Editing: Changed view source to edit) |
||
| (15 intermediate revisions by 2 users not shown) | |||
| Line 7: | Line 7: | ||
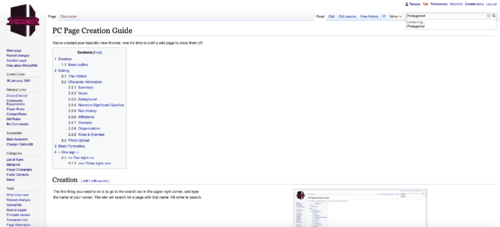
The first thing you need to do is to go to the search bar in the upper right corner, and type the name of your runner. The wiki will search for a page with that name. Hit enter to search. | The first thing you need to do is to go to the search bar in the upper right corner, and type the name of your runner. The wiki will search for a page with that name. Hit enter to search. | ||
|[[File:Search Bar.png|thumb|500px]] | |[[File:Search Bar.png|thumb|500px|Type your desired runner name into the search bar]] | ||
|- style="vertical-align:top;" | |- style="vertical-align:top;" | ||
| style="width: 40%" | | | style="width: 40%" | | ||
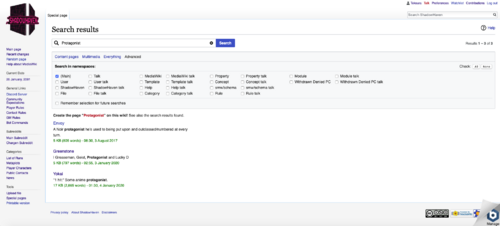
This will get you to a page which displays the wikis best attempts at searching for the name you selected. In the following picture, the page Protagonist does not exist, and is listed as a red link. You may click on that red link to begin creating the page. | This will get you to a page which displays the wikis best attempts at searching for the name you selected. In the following picture, the page Protagonist does not exist, and is listed as a red link. You may click on that red link to begin creating the page. | ||
If it turns out that the page already exists, please contact <code>@wiki</code> on our Discord server. We handle duplicate names on a case by case basis. Usually, if the name is already taken by a contact, we are happy to move the page for you. Usually, if the page is taken by a runner who is currently inactive, we may decide to move the page and ask that you keep a disambiguation link at the top. Usually, if there is an active runner of the same name, we are willing to set up a disambiguation page. We'll work with you to figure out the best way to help out if you had your heart set on a specific name, but once again these are handled on a case by case basis and no guarantee can be made that you'll get the primary page if you share a name with multiple runners. | If it turns out that the page already exists, please contact <code>@wiki</code> on our Discord server in the #wili-help channel. We handle duplicate names on a case by case basis. Usually, if the name is already taken by a contact, we are happy to move the page for you. Usually, if the page is taken by a runner who is currently inactive, we may decide to move the page and ask that you keep a disambiguation link at the top. Usually, if there is an active runner of the same name, we are willing to set up a disambiguation page. We'll work with you to figure out the best way to help out if you had your heart set on a specific name, but once again these are handled on a case by case basis and no guarantee can be made that you'll get the primary page if you share a name with multiple runners. | ||
|[[File:Protagonist Search Results.PNG|thumb|500px]] | |[[File:Protagonist Search Results.PNG|thumb|500px|On the search results page, if the page does not exist it will be a red link. Click that.]] | ||
|- style="vertical-align:top;" | |- style="vertical-align:top;" | ||
| style="width: 40%" | | | style="width: 40%" | | ||
| Line 22: | Line 22: | ||
Once you have clicked the red link, you will be taken to the blank page, where you can click "Create Source" to begin. See the next section for the basic outline and links to the template commonly used. | Once you have clicked the red link, you will be taken to the blank page, where you can click "Create Source" to begin. See the next section for the basic outline and links to the template commonly used. | ||
|[[File:Protagonist Blank Page.PNG|thumb|500px]] | |[[File:Protagonist Blank Page.PNG|thumb|500px|When creating the page, copy the text from [[Template:Player Character]] into the page to get started.]] | ||
|- style="vertical-align:top;" | |- style="vertical-align:top;" | ||
| style="width: 40%" | | | style="width: 40%" | | ||
| Line 37: | Line 37: | ||
|- style="vertical-align:top;" | |- style="vertical-align:top;" | ||
| style="width: 40%" | | | style="width: 40%" | | ||
We've included a pre-made template for you to use. Navigate to [[ Template:Player_Character ]] and click ' | We've included a pre-made template for you to use. Navigate to [[ Template:Player_Character ]] and click 'Edit'. | ||
|[[File:Template_view_source.png|thumb|500px]] | |[[File:Template_view_source.png|thumb|500px]] | ||
| Line 56: | Line 56: | ||
=Editing= | =Editing= | ||
To edit your character's wiki page you will want to click on 'Edit' in the same place where ' | To edit your character's wiki page you will want to click on 'Edit' in the same place where 'Edit' was on the PC template page. | ||
{| style="width: 85%;" | {| style="width: 85%;" | ||
| Line 63: | Line 63: | ||
===The infobox=== | ===The infobox=== | ||
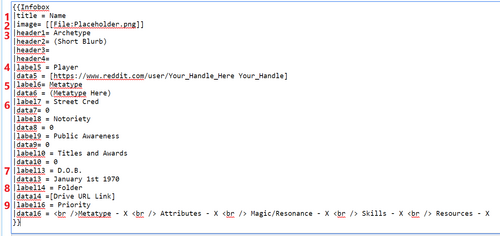
Many entries in the infobox will have comments added next to them offering specific instructions relating to the field they are next to. | |||
#For now we will leave the placeholder image be but we'll return to that later. | #For now we will leave the placeholder image be but we'll return to that later. | ||
#The <code>Archetype</code> value for 'header1' should be replaced with an archetype that best describes your character, e.g. "Adept Wheelman", "Swarm Rigger", "FLR Street Sam", etc. The values for 'header2' through 'header4' can be left blank or filled with short descriptors for your character according to taste. | #The <code>Archetype</code> value for 'header1' should be replaced with an archetype that best describes your character, e.g. "Adept Wheelman", "Swarm Rigger", "FLR Street Sam", etc. The values for 'header2' through 'header4' can be left blank or filled with short descriptors for your character according to taste. | ||
#From here on out you should only edit the values for 'dataX' tags, 'labelX' values should not be changed. The value for 'data5' is a link to your reddit profile. <code>Your_Handle_Here</code> should be replaced with your reddit name and <code>Your_Handle</code> can either be the same or your discord name. What you put instead of <code>Your_Handle</code> becomes the display text for the hyperlink to your reddit profile. | #From here on out you should only edit the values for 'dataX' tags, 'labelX' values should not be changed. The value for 'data5' is a link to your reddit profile. <code>Your_Handle_Here</code> should be replaced with your reddit name and <code>Your_Handle</code> can either be the same or your discord name. What you put instead of <code>Your_Handle</code> becomes the display text for the hyperlink to your reddit profile. | ||
#The value 'data6' is for your character's metatype or metasapient type, e.g. "Human", "Elf (Nocturna)", "Oni", "Pixie", etc. | #The value 'data6' is for your character's metatype or metasapient type, e.g. "Human", "Elf (Nocturna)", "Oni", "Pixie", etc. | ||
#Some qualities alter your Street Cred, Notoriety and Public Awareness. You'll find your values in the 'Character Info' tab for Chummer and | #Some qualities alter your Street Cred, Notoriety and Public Awareness. You'll find your values in the 'Character Info' tab for Chummer and HeroLab. In most cases these values will be '0' at character generation. | ||
#The date in our living world is the current real life date +61 years, | #The date in our living world is the current real life date +61 years, which you can find on the sidebar of the wiki to the left. Knowing your characters age you can calculate back to the year of their birth and then you just need to choose a date for their birth. | ||
#As was previously established in Step 5 of the [[Character Generation Guide]] you need to have a folder on Google Drive or Dropbox where you store your PDF file and your chum5 or por file depending on which character creation program you are using. 'data14' is where you put the link to that folder, external URLs are formatted with <code><nowiki>[http://your_url.com display_text]</nowiki></code>. | #As was previously established in Step 5 of the [[ShadowHaven_Reloaded:Character Generation Guide|Character Generation Guide]] you need to have a folder on Google Drive or Dropbox where you store your PDF file and your chum5 or por file depending on which character creation program you are using. 'data14' is where you put the link to that folder, external URLs are formatted with <code><nowiki>[http://your_url.com display_text]</nowiki></code>. | ||
# | #Under Priority, you replace the 'X' values with the priority letters you chose for each category. For example, changing <code>Metatype - X</code> to <code>Metatype - E</code>. | ||
At this point you should save your page if you haven't already, save often and then save some more applies here as well as everywhere else when dealing with computers. | At this point you should save your page if you haven't already, save often and then save some more applies here as well as everywhere else when dealing with computers. | ||
| Line 110: | Line 111: | ||
======Run History====== | ======Run History====== | ||
* [[Template:RunHistory]] should be used here. This should auto-populate when your character is tagged in an AAR. This template also will add your character to [[:Category:Active Runners]] if you have had a run in the past 6 months. | * [[Template:RunHistory]] should be used here. This should auto-populate when your character is tagged in an AAR. This template also will add your character to [[:Category:Active Runners]] if you have had a run in the past 6 months. You'll find this already included in [[Template:Player Character]]. | ||
======Affiliations====== | ======Affiliations====== | ||
| Line 121: | Line 122: | ||
*Our public contacts library can be found at [[:Category:Public Contacts]]. | *Our public contacts library can be found at [[:Category:Public Contacts]]. | ||
**You will need a fixer, and can find a list of only fixers at [[:Category:Fixers]]. | |||
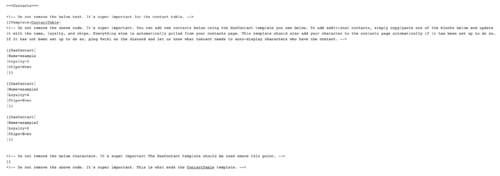
*Our new contact template should explain itself fairly easily. See [[Template:ContactTable]] for detailed instructions. | *Our new contact template should explain itself fairly easily. See [[Template:ContactTable]] for detailed instructions. | ||
*Simply fill in the name of the Contact, the Loyalty, and | *Simply fill in the name of the Contact, the Loyalty, and Chips represents favors owed. You should start with them Even. | ||
*The HasContact template can be duplicated as many times as you need it within the contact table. | *The HasContact template can be duplicated as many times as you need it within the contact table. | ||
*This should automatically pull information from your contacts page such as their Connection, Aspects, and Archetype. | *This should automatically pull information from your contacts page such as their Connection, Aspects, and Archetype. | ||
| Line 130: | Line 132: | ||
*Some qualities give characters Organizations as group contacts, if this applies to your character here is where they'd be. | *Some qualities give characters Organizations as group contacts, if this applies to your character here is where they'd be. | ||
*E.g. JackPoint - | **E.g. JackPoint - (which could be a result of a character having the Prime Datahaven Membership quality). | ||
*Group Contacts may be displayed here using [[Template:GroupContactTable]] in a way similar to what is described above. | *Group Contacts may be displayed here using [[Template:GroupContactTable]] in a way similar to what is described above. | ||
| Line 158: | Line 160: | ||
*To make bullet points, put a single asterisk at the start of the line | *To make bullet points, put a single asterisk at the start of the line | ||
**or do two, I won't judge | **or do two, I won't judge | ||
Internal links to other wiki pages, | Internal links to other wiki pages, are done by putting double brackets <nowiki>[[Page Name]]</nowiki> around the name | ||
External links have the format <nowiki>[ url.com | External links have the format <nowiki>[url.com link text]</nowiki> | ||
Section headers are designated with equals signs around the title: | Section headers are designated with equals signs around the title: | ||
| Line 172: | Line 173: | ||
===<nowiki>=== Three signs ===</nowiki>=== | ===<nowiki>=== Three signs ===</nowiki>=== | ||
[[Category:Guides]] | |||
Latest revision as of 21:08, 11 February 2022
You've created your beautiful new Runner, now it's time to craft a wiki page to show them off.
Creation
|
The first thing you need to do is to go to the search bar in the upper right corner, and type the name of your runner. The wiki will search for a page with that name. Hit enter to search. |
|
|
This will get you to a page which displays the wikis best attempts at searching for the name you selected. In the following picture, the page Protagonist does not exist, and is listed as a red link. You may click on that red link to begin creating the page. If it turns out that the page already exists, please contact |
|
|
Once you have clicked the red link, you will be taken to the blank page, where you can click "Create Source" to begin. See the next section for the basic outline and links to the template commonly used. |
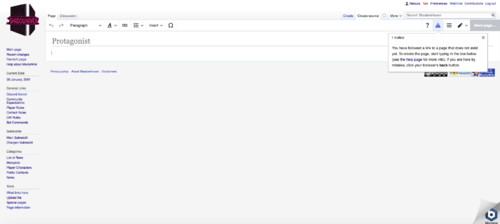 When creating the page, copy the text from Template:Player Character into the page to get started. |
|
|
Basic outline
|
We've included a pre-made template for you to use. Navigate to Template:Player_Character and click 'Edit'. |
|
|
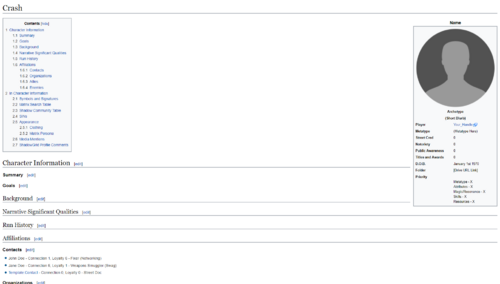
A textbox starting with "{{Infobox..." should appear, copy the entire contents of that textbox and paste it into the empty textbox on your own page. Click 'Save page' and you'll be faced with a page like this (only with your runner name where this example has 'Crash'): |
|
Editing
To edit your character's wiki page you will want to click on 'Edit' in the same place where 'Edit' was on the PC template page.
The infoboxMany entries in the infobox will have comments added next to them offering specific instructions relating to the field they are next to.
At this point you should save your page if you haven't already, save often and then save some more applies here as well as everywhere else when dealing with computers. |
|
Character informationSummary
Goals
Background
|
|
Narrative Significant Qualities
Run History
Affiliations
|
|
Contacts
Organizations
Allies & EnemiesIn many cases the information that might fit here would be duplicated from elsewhere, your contacts should certainly count as your allies and an enemy from the Vendetta negative quality should be detailed in the Narrative Significant Qualities section. If you find use for these two parts of your wiki page go wild but you can also safely leave them blank. |
Photo Upload
If you've found a photo that you like for your character you can upload that to the wiki server on Special:Upload. Follow the directions on that page to upload the file from your computer, then copy the last part of the new url File:Pic_Name.jpg.
Paste that part into the top part of the infobox, replacing the File:Placeholder.jpg.
You can either edit the picture to a good size before uploading (width of 200 - 300 px is recommended) or you can add syntax to the infobox that limits how big the picture appears on the wiki page with this formatting [[File:Pic_Name.png|200px]].
If you are like me, and have no skill for drawing, here is a link to download the portraits from the Shadowrun Returns games.
Basic Formatting
Italicized words are done by putting two (not a double) single quotes around the ''word or phrase''
Bolded words are done by putting three quotes around the '''phrase'''
Bolded and italicized words are done by adding five quotes around the '''''phrase'''''
- To make bullet points, put a single asterisk at the start of the line
- or do two, I won't judge
Internal links to other wiki pages, are done by putting double brackets [[Page Name]] around the name
External links have the format [url.com link text]
Section headers are designated with equals signs around the title:
